DIY McElligot’s Pool: Summer Reading Spot

Tuesday, May 31, 2011

To keep my kids reading all summer I made McElligot's Pool for our reading spot.
100_4659_1
I still remember my first grade teacher had a 6-foot, hard-plastic pool in her classroom. Children could earn the right to take their books into the pool for reading time. She always had some pillows and a variety of books scattered inside.  I’ve always wanted to make my own reading pool so I decided to make McElligot's Pool for my kids at home.

Mcelligots_pool cover

McElligot's Pool is another fantastic imaginative story from Dr. Seuss. I always think about it when I go fishing. Make sure you grab it from your library to try reading it in the pool. Or if you’d like to buy it to add to your Dr. Seuss collection click the book above.

MAKE YOUR OWN McELLIGOT’S POOL
Free Printable Sign. You can copy and save the image below or paste it into Microsoft Word to print at the size you want.  I printed the 4x6 size and cut it out and taped it on the pool. You could make it larger if you plan to put it on a post but I thought this small size was easier and safer for kids.
McElligotsPoolSignz

The kids love hopping into the pool to read.
100_4652_1

This pool was just the right size for our small reading loft. It was $5 at Wal-mart. I saw a little bit bigger one, two rings high, for $8. I’ve also seen similar ones at the grocery store on their seasonal isle. Grab a pool right now while they are in season. These little ones go quick.  I liked the fish design for this project and we can deflate it to get it out of the way and put it up quickly when we want to.
100_4655_1

Remember Dr. Seuss’ advice to, “Fill your house with stacks of books, in all the crannies and all the nooks.” IMGP3246_1Here is my sweet baby boy surrounded by our favorite books.

Keep your child reading all summer. Visit your local library as much as possible. We love the libraries in Salt Lake City. Click below to see my guest post about our Library's Summer Reading Program on I Heart Salt Lake.

Linking this project at these great blogs:
I Can Teach My Child
Somewhat SimpleTodays Creative Blog

Tip Junkie handmade projectsThirty Hand Made Days

Arthur Books, Going Green with Author Marc Brown

Thursday, May 26, 2011

Arthur, the friendly aardvark, returns after 10 years to teach children how to save the environment in Marc Brown’s newest book, Arthur Turns Green
Arthur Green Cover
A few weeks ago I was able to take my kids to see Marc Brown speak at our local public library. He took questions from the kids, then told of his inspirations for his characters and story ideas.

Since we often read Arthur books to our kids and they watch the TV shows on PBS several times a week, I was surprised to find out this is the first book he has written in 10 years, in honor of the 35th anniversary of Arthur. He is doing a small tour to promote the book and seemed sincerely focused on encouraging kids to learn how to save the environment.

Here are 6 Ways to GO GREEN I discussed with our kids after listening to him read this book:
  1. Share our books with others and when we are done with them, donate them to a charity like READING TREE who distributes them or recycles damaged books.
  2. Turn the water off while brushing your teeth.
  3. Turn lights off when you aren’t in a room.
  4. Put paper and special plastics in our recycle bin.
  5. Turn off toys when finished playing to not waste batteries (reducing landfill waste).
  6. Put toys and clothes (they’ve outgrown) into the Yard Sale Box.  We have a yard sale every other year and promote it as a ‘Recycle Sale’.  Here is a sign I created to ‘brand’ our yard sale. I put it in the classifieds and print it on card stock then attach it to a florescent green poster board with more time/date/location details to hang around our neighborhood. We’ve had a lot of success with people saying it got their attention.
recycle Sale
Free Printable for Yard Sale, Recycle Sale

The kids and I also thought it was fascinating to find out Marc Brown lived on Martha's Vineyard where he has to take a ferry to get home.  He spoke about his barn/old school house that was turned into a studio where he writes and illustrates the Arthur stories. More about where he lives and creates his books.
Marc Brown SLC April 11 Video of Marc Brown reading his new book, Arthur Turns Green can be found on Lesson Plan SOS, an amazing blog.
Our local library has a great puppet named Earl E. Literacy. See Earl’s interview with Marc Brown here.
Marc Brown SLC My kids had him sign several books they brought from home. The local book shop sponsoring the event ran out of the new book before the event so we’ve still got to find a way to get a copy of Arthur Turns Green

Home Diner: Reading Spot

Literacy in our Home Diner:
Our kitchen is decorated as a diner. We call it our ‘Soda Shop.’ Having a diner in the home has been so fun for our family. We try to teach our kids good restaurant manners and it offers a variety of literacy opportunities.
Soda Shop Sign, Printable
The kids read our custom snack menu and use a waiter notebook to take orders.

Our snack menu has 15 items I always have on hand (chicken nuggets, quesadillas, grilled cheese, tomato soup, chips and salsa, french toast, green eggs and ham and more). I found pics on Google of each item then put it in Microsoft Word and labeled each. I printed it and put it inside a plastic sheet protector. The younger kids love the visual menu. The older kids love to write down the order.  We also just got a dinner bell they can ring and say “Order Up!”

They can write on the menu chalk board which also becomes a message board for special days.
 Menu Birthday sign_1

We do homework together sitting at the booth every day after school. Notice the menu hanging on the chalk board.100_4002
When friends visit they sign our Graffiti Wall. The kids love to write on the wall and leave their mark.
Graffiti Wall Restaurant Home Diner 
Then there are all the fun signs to read. I collect vintage signs and have found some reproduced vintage looking metal signs.Diner Blog-1
We have two booths and a bar that can seat a total of 16 people. I found both booths in our local classifieds. We eat dinner at the black one. The kids do crafts and have snacks at the smaller red booth and we eat breakfast at the bar.
100_6442_1-1
The kids love to watch PBSKids on TV during breakfast. 50s Party14Chrome lined bar, Bread Box and Bar Stools. Napkin Holder and Straw dispenser. We put crayons in the little red striped bucket. We are planning to add a chrome plate (diamond plate) to the wall below the bar so when the kids kick the wall it will be easier to clean.
I love the Juke Box CD player I found in the local classifieds for $20. I found the neon clock at Checkers Auto store.  100_4029
We just recently put an IKEA Expedit book case under the window to hold all the kids crafts and some toys to keep them busy while I’m baking.  See the Mr. Potato Heads on the floor? Also notice the new indoor awning I sewed last month. It makes such a difference.
It’s all in the details. Click here to see smaller items we’ve added to decorate the diner.
 
Saley Soda Shop
Our ice cream glasses were found at a vintage consignment store in Salt Lake City. I like to stick apples in them for display. 50s Party15Our beta fish and dwarf frogs like to hang out on our vintage pie closet. This holds all our cook books, including Diners Drive-ins and Dives on top.

Diner Print-1These are pics I took at Ruby’s Diner in Newport Beach, CA and at the Road Island Diner in Utah. I printed them on canvas and hung them in our diner.
106_9075_1 I grew up eating Grits (ground up corn boiled and soaked). I remember my mom quoting the waitress Alice from the TV show ‘Mel’s Diner’. She would always say “Kiss My Grits.” So I found this board with hooks and the checkerboard tile and stuck her picture in the middle. It makes a great hot pad holder next to our old fashioned phone from Pottery Barn I found at a DownEast Outlet for $5.00.
Here are a few more pics of the room including making the indoor awning curtain valance.
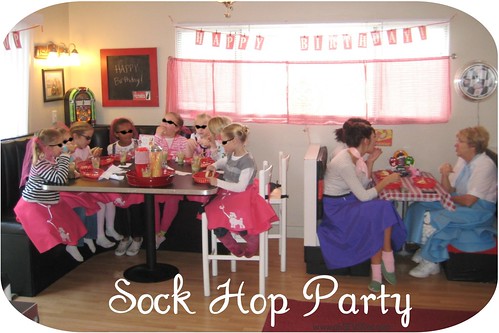
See more 50's ideas at our Sock Hop Party.

Listed this project at:
Tatertots and Jello's Weekend Wrap-Up Party.
Home Stories A to Z, Tutorials & Tips


BOOKS FOR KIDS: Linking Literacy to Life
Try this book: What Happens to a Hamburger? What happens to food after you eat it?
Amazon Review:
This book is about a diner cook who loves to eat healthy food and we find out what happens to that food in this well written and illustrated book by Paul Showers and Edward Miller. There are little experiments and up close photos of digestive organs which can delightfully gross out your child while one reads and learns about this important system of the body. My 4 year old daughter wants to be a doctor when she grows up so I am always on the look out for books about the body. I love all of the "Let's-Read-And-Find-Out Science" books and they have several very good books available regarding how the body works. – by Moon Dancer, Reviewer

What Happens to a Hamburger? (Let's-Read-and-Find-Out Science 2)Children's Diet & Nutrition Books)


Diner Picture Books

Diner Recipe Books


Make a No-Sew Poodle Skirt

Monday, May 16, 2011

How to make a No-Sew Poodle Skirt 

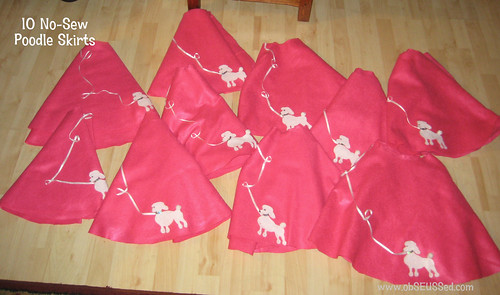
For our 50's Sock Hop birthday party I made 10 poodle skirts as dress-up favors for the girls to wear during the party, then take home.  I wanted to keep them simple and low-cost.  I made them for about $6 per skirt. Once I made the first one, the rest were much quicker to make so I thought I'd share how I did them to save you some time.  I'll admit I don't like making things that require sewing patterns or pinning fabric. I always end up using my seam ripper. So I came up with this NO-SEW pattern to make a poodle skirt. I also needed them to be adjustable because we had very different waist sizes coming to this party that I couldn't measure in advance.  These are perfect for a Halloween costume, playing dress-up or for a dance recital.

Materials Needed
For Skirt:
  • Measure waist to knees of the girl. However long you want it to go, double that number Then add 8. That is how big you'll want your square of fabric.  I wanted 17 inches long(doubled is 34 inches) plus  8 (for the waist cut) to make the square 42 x 42 inches to start. (Waist to knee length + 8 = length of 1 side of fabric square.)
  • 42 inch x 42 inch square piece of colored felt. (Popular 50's colors, pink, baby blue, purple, red or black) Buy 1 and 1/2 yards of 72 inch wide felt. (I used a 40% off coupon at Joann Fabrics for 1 huge cut to make 10 skirts)
  • 1 package Iron-On Velcro (Amazon has it for $3 affiliate)
  • Measure tape
  • Fabric scissors and cutting mat
For Poodle:
  • Hot glue gun
  • 7 inch x 7 inch square of white felt (could use black) If you're just making one skirt you could easily buy the 8.5 x 11 sheet of felt from your craft store. If you need to make more, I recommend buying the 72 inch felt off the bolt.
  • small pom pom for tail (matching color)
  • Sharpie marker (black to draw eyes and nose)
  • Collar - 3 inches of sequin ribbon
  • Leash- 20 inches of 1/4 inch wide ribbon (often a spools run 3 for $1 at JoAnn's) 

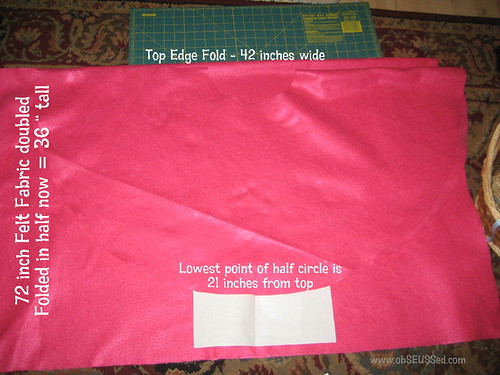
  1. Lay out the felt folded to measure and make sure you have enough fabric. (This picture shows me using my first skirt as a template to copy and trace onto the fabric for my 2nd skirt).
  2. Unfold and measure the square 42x42 and cut to make the square.
  3. Now, fold the 42x42 square into an 21x21 square.
  4. Cut a curved line from opposite corners to cut off the open edge. This curve becomes the bottom edge of your skirt. (See picture, this was my doll version size but you get the idea.)

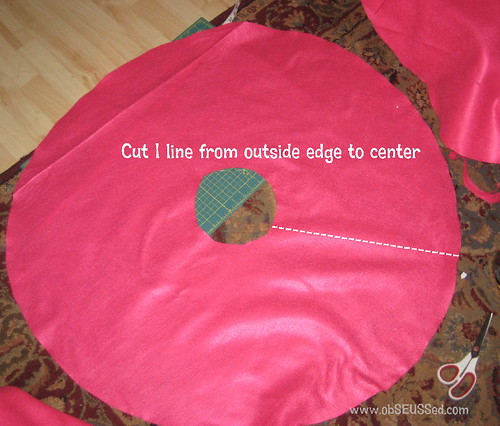
5. While folded, mark 4 inches from the folded corner on both folded sides. Cut a curved line from each mark.  This creates a 16 inch waist opening. It will be adjustable.
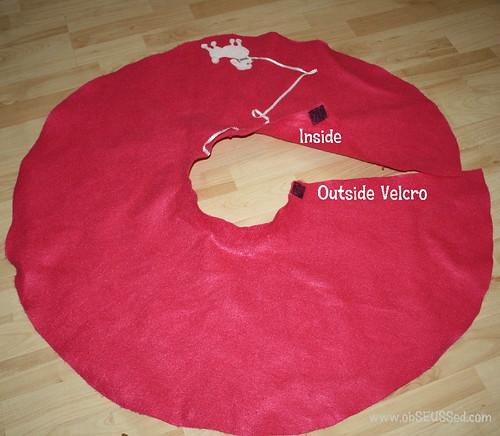
6. Pick any area and cut a line from the outer edge all the way to the center circle.
Pin It


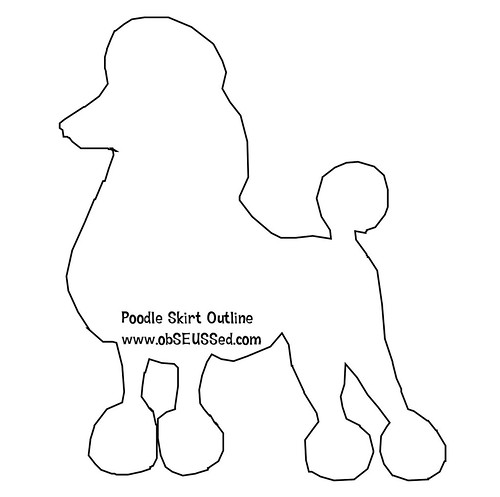
FREE PRINTABLE: I created this outline.
7. Copy and paste this image into 'Microsoft Word' or another program. You can adjust the size. You'll want it about 6 inches tall.


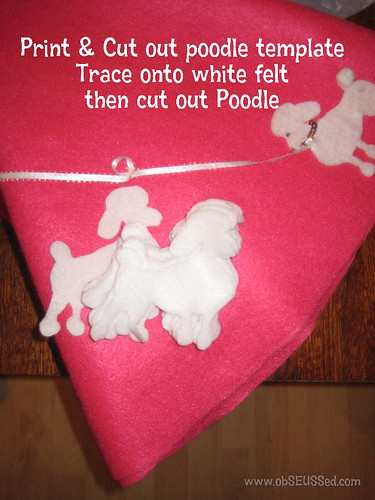
8. Print the template and cut out the poodle on your paper.
9. Place on white felt, trace around the edge.
10. Now cut out the felt poodle.


11. Hot glue the sequin ribbon behind the neck to hold in place on both sides. Hot glue one end of the leash ribbon behind the neck too. 

TIPS
Poodle Position: Wrap the skirt around your daughter to see where you want to lay the poodle.

EXCESS WRAP: You can cut the length of the circle shorter if you don't want as much excess wrap. If so, cut it first then add the velcro on the ends as directed below.

12. Now, hot glue the poodle onto skirt.
13. Then glue the pom pom on the tail.


14. Just hot glue a few spots on the leash to hold it in place.  Add a few loops for decoration.
 15. Glue the ribbon up to the waist of the skirt and tuck onto back side of skirt.
16. Open velcro, cut 2 pieces of the loop/pokey style (not the soft matching velcro), 2 inches long.

17. Next, layout your velcro, one on outside top corner edge of skirt, one on inside top corner edge. You want the pokey part of the velcro so it will stick to the skirt once you wrap it.  Now iron both pieces on as directed by the velcro package.

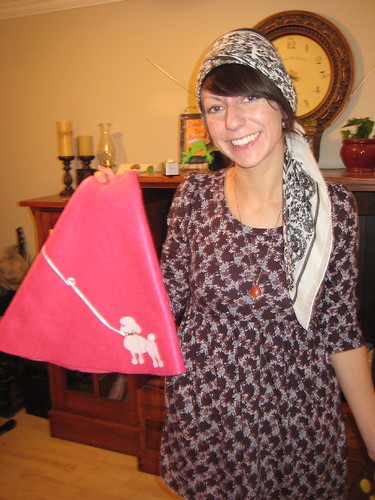
18. Try it on. Wrap it around your daughter and the velcro will stick to the skirt where needed. Works for larger and smaller waists.

My sweet sister helped me make 10 of these skirts for my daughter's birthday party.


Pin It

If you'd prefer to sew a skirt for everyday wear, check out the circle skirt tutorial on MADE. She has tips that would help you with this skirt as well.
When you need to make a quick skirt or a lot for a group, this pattern is perfect, but if you aren't the crafty type or would rather save time you can always just purchase a skirt on Amazon. The $14 price is great. (Disclosure: As an Amazon Affiliate, I do receive a small percentage of sales made using the link below. Thanks!)
   

  Children's Books: 
At obSEUSSed, we feature children's books and activities. We want families connecting their activities and reading experiences.  If you make this skirt, check out a poodle related book at your local library or try one of these books from Amazon.

I also found some fabulous paper dolls with 50's fashion and poodle skirts from Paper Studio Press.


See how to make a matching poodle skirt for an 18 inch doll.
I really wanted the Maryellen American Girl doll (for myself ;) but we made the skirt for my daughter's doll and she was happy to have the matching skirts.

See more 50's ideas at our Sock Hop Party.

If you try making a skirt I'd love to see pictures. If you post it online, leave a link in the comments below or send me an email (obSEUSSed (at) live.com)
Let me know if you have any questions about making your own poodle skirt.

UPDATE: November 2016. I love seeing all the comments of those who have used this tutorial to help them make skirts.  I'd love to see your pictures. Email me a photo of how yours turned out and I'll add it to this post for others to see. Email obSEUSSed (at) live.com (or click the email button in the top right column). Thanks so much! It makes my day to see others successfully making these cute skirts.

YOU DID IT! Comments and photos from readers who made the skirts. They turned out Swell!!


Rebecca in Texas said: "Just wanted to say thanks for posting your tutorial. I discovered it through a Google search when I found out my daughters' school would have 50's Day. I'm not crafty at all and was pretty intimidated to take on such a project, but your easy instructions made it a breeze. My girls love their skirts and I had enough scraps to make one for their baby sister as well!" 
Thanks again and please keep blogging! Rebecca"


Mike in Georgia made these for his twin daughters:
"I had no experience and bought a yard and half of each felt, more than I needed since each girl was 14+8 and 16+8 for size.
I ended up cutting the wrong color first so both became 14+8. All good as they look good on the girls. They received lots of comments and even with buying extra materials and forgetting to give Joann my 40% coupon it was still less than $27 for two skirts. Two hours later (9pm to 11pm the night before the dance…) they were completed.
By the way – These are twin 8 year olds, 1 minute apart… Thank you for sharing a quick and easy plan to follow. Mike"

10/23/13 Mirna M. said "Thanks so much for the easy steps. I'm horrible crafty but this turned out pretty good. Here is my skirt."


July 2014, Kathy (@mabelgabel on Instagram) shared this photo.  She used this pattern to help her group of girls at church to make their own skirts for a daddy-daughter 50's party.


Linking to more great ideas at Tip Junkie.
(Disclosure: As a Google & Amazon Affiliate, I do receive a small percentage of sales made using the links below. These would be great to complete the costume or prepare for a 50's Party. Thanks!)

LinkWithin

Related Posts with Thumbnails