

Showing posts with label costume. Show all posts

Dr. Seuss Costume Accessories Giveaway and Photo Booth Ideas

Wednesday, February 18, 2015

Get ready to celebrate Dr. Seuss’ birthday with some fun photo prop costumes.
Dr_Seuss_PhotoBooth_Props_Costumes_giveaway_obSEUSSed
We got to check out some fun Dr. Seuss accessories from Pure Costumes.  They sent us the Lorax Truffula Tree Boppers headband, the Cat in the Hat headband and the Lorax Accessory Kit (includes hat, sun glasses and mustache).  We also have a set to giveaway (see how to enter below). Here are my kids photo booth style.Dr_Seuss_PhotoBooth_Props_Costumes_giveaway_obSEUSSed_2
Costume Review:
All three products are very professionally made.  They are not indestructible though, so I had to warn my kids to be soft with them so they didn’t break the first day. 
The Cat in the Hat, tiny hat, was squished when it arrived.  I tried to fluff it but it wouldn’t budge.  I finally grabbed an empty toilet paper roll and cut about 1 inch off the end then used the remaining part of the tube to stuff in the tiny hat and it fit perfectly and helped it keep its form.
As with all photo booth props, you probably want a grown-up monitoring the use of props or kids will get out of hand with them. The mustache is held on with a plastic thread that hooks around your head. It may not be great to have multi-users with this one if kids lick it or stretch the cords. 
Over all, I’m excited to use these photo booth props at our upcoming school Dr. Seuss carnival next month.
Pure Costumes offered an extra set of these Dr. Seuss costume photo props to give away to one of my readers.
Dr_Seuss_Costumme_Giveaway_obSEUSSed
GIVEAWAY ENDED 2/25/15.
GIVEAWAY RULES:  This contest is open to U.S. residents with a U.S. postal address. Must be age 18 or older to enter.  Pure Costumes is responsible for the prize package and will ship it to the winner. Contest ends Wednesday, Feb. 25 at midnight CST.
a Rafflecopter giveaway

DISCOUNT:
Pure Costumes has also offered a discount code for any of my readers.  Use code: OBSEUSSED to receive 10% off your subtotal. It cannot be combined with other coupon codes and it expires 10/31/15. Take a look at all their fun costumes, perfect for celebrating Read Across America and Dr. Seuss’ birthday.
cat in the hat costume pure costumes
Disclosure: I received the 3 Dr. Seuss accessories to review for the purposes of this post.  All opinions are 100% my own.

Pure Costumes also has a fun free Dr. Seuss Printable.

They also have a simple Dr. Seuss Pinterest Contest happening. See more details on their site.


Dr. Seuss Photo Booth:
I created a Dr. Seuss photo booth corner at our school Dr. Seuss carnival.
I used fabric (from Wal-mart) for the background and to cover the bench.
I’ve been collecting a variety of items and creating my own as props over the years.
Dr_Seuss_Photo_Booth_props_obSEUSSedDr_Seuss_Photo_Booth_props_obSEUSSed_2Dr_Seuss_Photo_Booth_props_obSEUSSed_3
Dr_Seuss_Photo_Booth_props_obSEUSSed_DIY
At the carnival we had a station to make your own photo booth props.  My son made this headband and attached a Lorax mustache with popsicle sticks.Dr_Seuss_Lorax_Photo_Booth_props_obSEUSSed
Another way to make a Lorax mustache is to get a yellow feather boa (can be found at craft stores).  I cut it into strips (it gets messy). Then I hot glued two craft sticks (popsicle sticks) together at an angle. Then I glued the feathers on.
make_Lorax_Mustache_obSEUSSedmake_Lorax_Mustache_obSEUSSed_2make_Lorax_Mustache_obSEUSSed_3Seuss Lorax family
I found this blank wooden had prop at Michael’s Crafts Store. My son helped paint red and white stripes on it. Then we drew black sharpie marker on the lines and added extra lines to help it look like the illustrated hat from The Cat in the Hat book.
Dr_Seuss_Photo_Booth_props_obSEUSSed_cAT_IN_tHE_hAT
For the Truffula Tree we found a craft feather boa at Joann’s Crafts and cut a circle from a strong poster board. I hot glued the feather boa into a circle to cover the poster board.  We found a piece of scrap wood in our garage and painted it yellow and again added the black lines with a sharpie marker to add illustration details.
Dr_Seuss_Photo_Booth_props_obSEUSSed_tRUFFULA_cAT_hAT
I cut out a white piece of felt and used a black sharpie marker to write THING 1. Then I used a safety pin to attach it to my son’s red shirt.  The turquoise hair is actually an old pillow cover that got ruined so I kept part of the fabric to use as hair.
I found similar fabric on Amazon (search faux fur turquoise) you could make a bunch of little wigs or cut into strips to glue to headbands.
Pure Costumes has Thing 1 Thing 2 wigs and headbands too. I really want some of the headbands for our photo booth but they are out of stock right now.  Keep checking because these will be perfect for dressing up.
Thing 1_Thing_2_Dr_Seuss_Costumes
I got the READ banner from Oriental Trading and the tall Cat in the Hat display from a bulletin board set. (Amazon affiliate link.)
Dr_Seuss_Photo_Booth_props_obSEUSSed_Truffula_Tree
I made the Truffula Trees using a pool noodle (again drawing black lines with a sharpie marker), a plunger from the dollar store and a spiky poof ball made out of purple and green tissue paper.  You could make so many different colors.
IMG_0644
We were lucky to have our local PBS station, KBYU, bring their Cat in the Hat character to our Dr. Seuss carnival.  This year I plan to set the photo booth props right next to his station so kids can dress up and take photos with the cat.
IMG_0794
Costumes are a great way to celebrate Dr. Seuss’ birthday and Read Across America day. Don’t forget to enter the giveaway above.

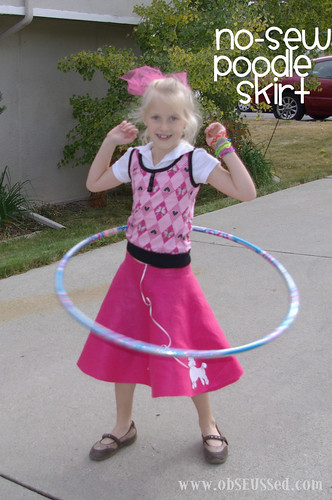
Make a No-Sew Poodle Skirt

Monday, May 16, 2011

How to make a No-Sew Poodle Skirt 

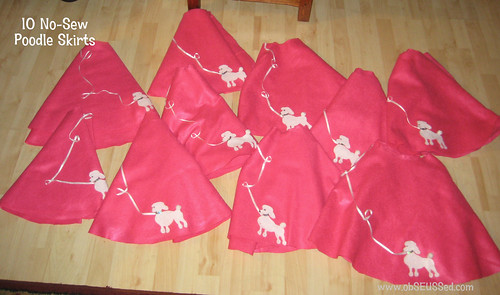
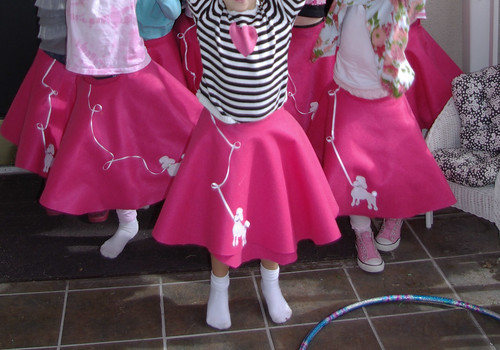
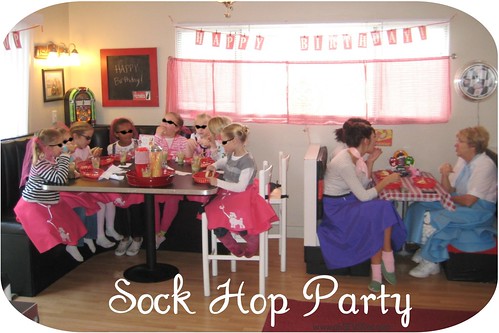
For our 50's Sock Hop birthday party I made 10 poodle skirts as dress-up favors for the girls to wear during the party, then take home.  I wanted to keep them simple and low-cost.  I made them for about $6 per skirt. Once I made the first one, the rest were much quicker to make so I thought I'd share how I did them to save you some time.  I'll admit I don't like making things that require sewing patterns or pinning fabric. I always end up using my seam ripper. So I came up with this NO-SEW pattern to make a poodle skirt. I also needed them to be adjustable because we had very different waist sizes coming to this party that I couldn't measure in advance.  These are perfect for a Halloween costume, playing dress-up or for a dance recital.

Materials Needed
For Skirt:
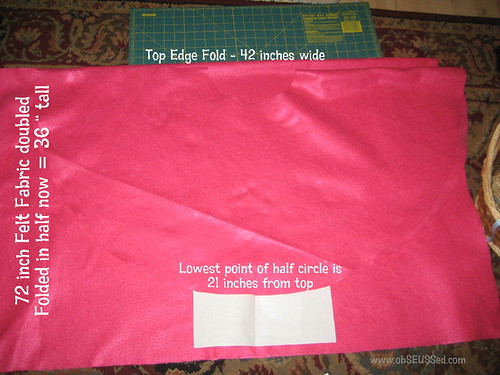
  • Measure waist to knees of the girl. However long you want it to go, double that number Then add 8. That is how big you'll want your square of fabric.  I wanted 17 inches long(doubled is 34 inches) plus  8 (for the waist cut) to make the square 42 x 42 inches to start. (Waist to knee length + 8 = length of 1 side of fabric square.)
  • 42 inch x 42 inch square piece of colored felt. (Popular 50's colors, pink, baby blue, purple, red or black) Buy 1 and 1/2 yards of 72 inch wide felt. (I used a 40% off coupon at Joann Fabrics for 1 huge cut to make 10 skirts)
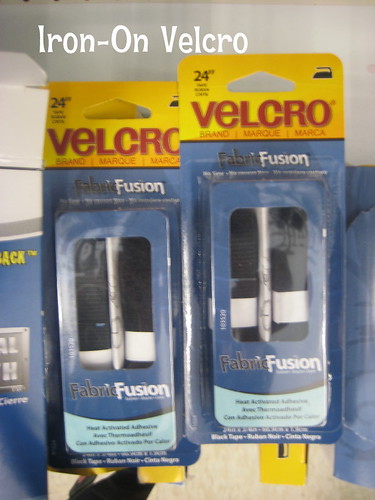
  • 1 package Iron-On Velcro (Amazon has it for $3 affiliate)
  • Measure tape
  • Fabric scissors and cutting mat
For Poodle:
  • Hot glue gun
  • 7 inch x 7 inch square of white felt (could use black) If you're just making one skirt you could easily buy the 8.5 x 11 sheet of felt from your craft store. If you need to make more, I recommend buying the 72 inch felt off the bolt.
  • small pom pom for tail (matching color)
  • Sharpie marker (black to draw eyes and nose)
  • Collar - 3 inches of sequin ribbon
  • Leash- 20 inches of 1/4 inch wide ribbon (often a spools run 3 for $1 at JoAnn's) 

  1. Lay out the felt folded to measure and make sure you have enough fabric. (This picture shows me using my first skirt as a template to copy and trace onto the fabric for my 2nd skirt).
  2. Unfold and measure the square 42x42 and cut to make the square.
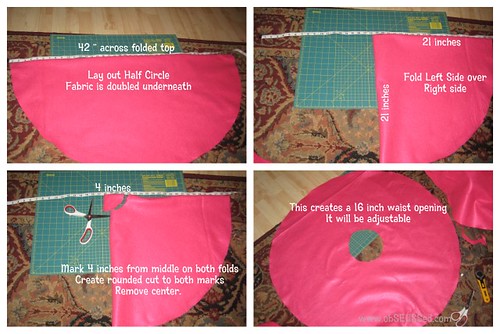
  3. Now, fold the 42x42 square into an 21x21 square.
  4. Cut a curved line from opposite corners to cut off the open edge. This curve becomes the bottom edge of your skirt. (See picture, this was my doll version size but you get the idea.)

5. While folded, mark 4 inches from the folded corner on both folded sides. Cut a curved line from each mark.  This creates a 16 inch waist opening. It will be adjustable.
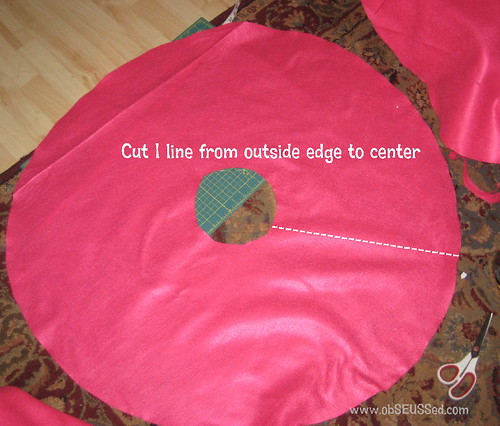
6. Pick any area and cut a line from the outer edge all the way to the center circle.
Pin It


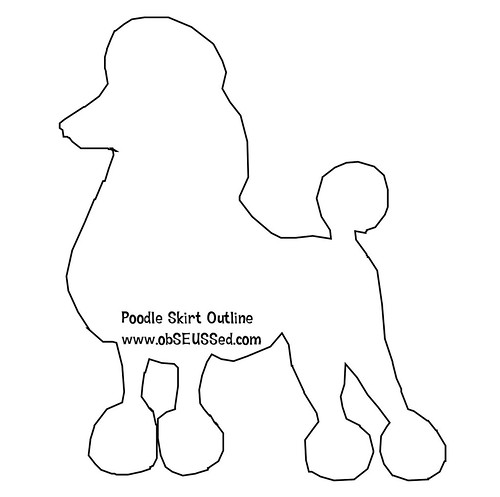
FREE PRINTABLE: I created this outline.
7. Copy and paste this image into 'Microsoft Word' or another program. You can adjust the size. You'll want it about 6 inches tall.


8. Print the template and cut out the poodle on your paper.
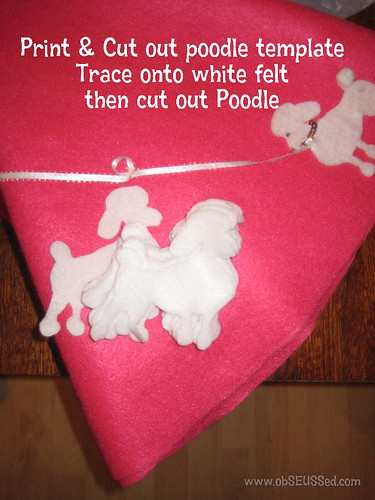
9. Place on white felt, trace around the edge.
10. Now cut out the felt poodle.


11. Hot glue the sequin ribbon behind the neck to hold in place on both sides. Hot glue one end of the leash ribbon behind the neck too. 

TIPS
Poodle Position: Wrap the skirt around your daughter to see where you want to lay the poodle.

EXCESS WRAP: You can cut the length of the circle shorter if you don't want as much excess wrap. If so, cut it first then add the velcro on the ends as directed below.

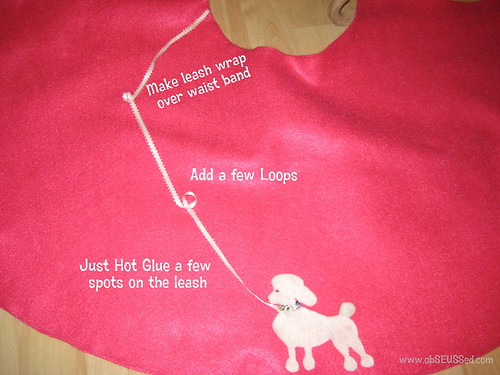
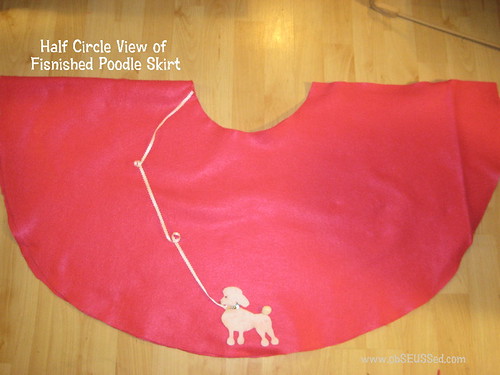
12. Now, hot glue the poodle onto skirt.
13. Then glue the pom pom on the tail.


14. Just hot glue a few spots on the leash to hold it in place.  Add a few loops for decoration.
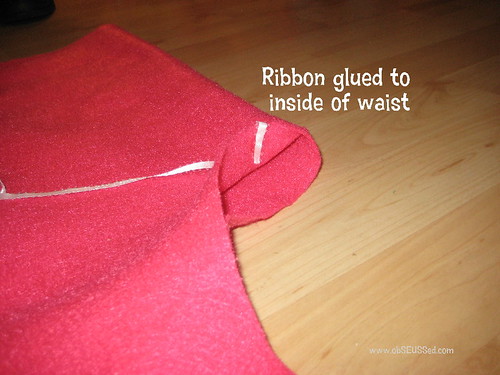
 15. Glue the ribbon up to the waist of the skirt and tuck onto back side of skirt.
16. Open velcro, cut 2 pieces of the loop/pokey style (not the soft matching velcro), 2 inches long.

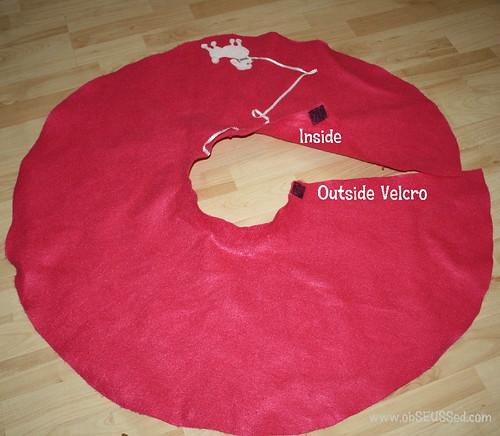
17. Next, layout your velcro, one on outside top corner edge of skirt, one on inside top corner edge. You want the pokey part of the velcro so it will stick to the skirt once you wrap it.  Now iron both pieces on as directed by the velcro package.

18. Try it on. Wrap it around your daughter and the velcro will stick to the skirt where needed. Works for larger and smaller waists.

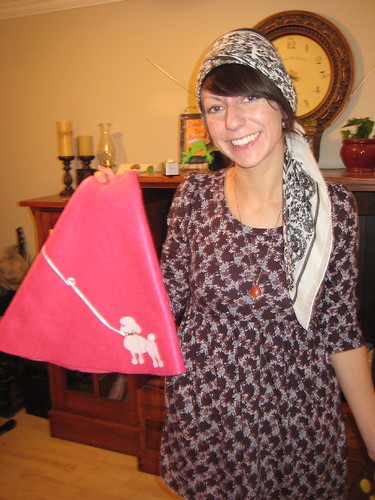
My sweet sister helped me make 10 of these skirts for my daughter's birthday party.


Pin It

If you'd prefer to sew a skirt for everyday wear, check out the circle skirt tutorial on MADE. She has tips that would help you with this skirt as well.
When you need to make a quick skirt or a lot for a group, this pattern is perfect, but if you aren't the crafty type or would rather save time you can always just purchase a skirt on Amazon. The $14 price is great. (Disclosure: As an Amazon Affiliate, I do receive a small percentage of sales made using the link below. Thanks!)
   

  Children's Books: 
At obSEUSSed, we feature children's books and activities. We want families connecting their activities and reading experiences.  If you make this skirt, check out a poodle related book at your local library or try one of these books from Amazon.

I also found some fabulous paper dolls with 50's fashion and poodle skirts from Paper Studio Press.


See how to make a matching poodle skirt for an 18 inch doll.
I really wanted the Maryellen American Girl doll (for myself ;) but we made the skirt for my daughter's doll and she was happy to have the matching skirts.

See more 50's ideas at our Sock Hop Party.

If you try making a skirt I'd love to see pictures. If you post it online, leave a link in the comments below or send me an email (obSEUSSed (at) live.com)
Let me know if you have any questions about making your own poodle skirt.

UPDATE: November 2016. I love seeing all the comments of those who have used this tutorial to help them make skirts.  I'd love to see your pictures. Email me a photo of how yours turned out and I'll add it to this post for others to see. Email obSEUSSed (at) live.com (or click the email button in the top right column). Thanks so much! It makes my day to see others successfully making these cute skirts.

YOU DID IT! Comments and photos from readers who made the skirts. They turned out Swell!!


Rebecca in Texas said: "Just wanted to say thanks for posting your tutorial. I discovered it through a Google search when I found out my daughters' school would have 50's Day. I'm not crafty at all and was pretty intimidated to take on such a project, but your easy instructions made it a breeze. My girls love their skirts and I had enough scraps to make one for their baby sister as well!" 
Thanks again and please keep blogging! Rebecca"


Mike in Georgia made these for his twin daughters:
"I had no experience and bought a yard and half of each felt, more than I needed since each girl was 14+8 and 16+8 for size.
I ended up cutting the wrong color first so both became 14+8. All good as they look good on the girls. They received lots of comments and even with buying extra materials and forgetting to give Joann my 40% coupon it was still less than $27 for two skirts. Two hours later (9pm to 11pm the night before the dance…) they were completed.
By the way – These are twin 8 year olds, 1 minute apart… Thank you for sharing a quick and easy plan to follow. Mike"

10/23/13 Mirna M. said "Thanks so much for the easy steps. I'm horrible crafty but this turned out pretty good. Here is my skirt."


July 2014, Kathy (@mabelgabel on Instagram) shared this photo.  She used this pattern to help her group of girls at church to make their own skirts for a daddy-daughter 50's party.


Linking to more great ideas at Tip Junkie.
(Disclosure: As a Google & Amazon Affiliate, I do receive a small percentage of sales made using the links below. These would be great to complete the costume or prepare for a 50's Party. Thanks!)

Hop on Pop

Wednesday, July 28, 2010

Dad has been kind enough to dress up as the Cat in the Hat for Halloween and in March for Dr. Seuss' birthday. He went to read to the kindergartners this year. It is a simple, quick costume to create with a black sweat suit, white felt for the tummy and red felt for the bow. We just safety pinned them onto the black suit so we can take them off after costume time. And you can find hats at your local party store or online or make one yourself. Ask if your Pop will dress up for you too! Thing 1 is easy to do with a piece of white felt (write the words on with permanent marker). I pinned it to a red fleece shirt I had.  The hair I made by buying fluffy turquoise yarn and got an old ski/stocking cap which I sewed the yarn to the winter hat so I could just put it over my hair easily. I love quick, home made costumes.
Trunk-Or-Treat

Linking to: Today's Creative, Get Your Craft On


LinkWithin

Related Posts with Thumbnails