Showing posts with label Halloween. Show all posts

Dr. Seuss Inspired Pumpkin Template

Tuesday, October 28, 2014

Try celebrating Dr. Seuss during Halloween.  I created a Dr. Seuss inspired jack-o-lantern.  I carved my pumpkin as the Cat in the Hat’s face and added the striped stove pipe hat on top.
Cat in the Hat Pumpkin glow template obSEUSSed

You can make one too.  I created this template for my obSEUSSed readers.  You can print it out. Then use a pen to draw over the lines and cut through the paper to draw onto the pumpkin. This will tell you where to use your carving knife. 
The black is where to use your carving knife to cut all the way through leaving a large enough cut that light can show through from the inside out.
The orange is where you scrape the top layer of the pumpkin off to expose the next layer.  There are special scraping tools to help you do this.  It still lets some light through the pumpkin, but not as bright so it has a softer effect.
Cat in the Hat Pumpkin template jackolantern obSEUSSed 14
Copy or save jpg file and print on 8.5 x 11 paper.  Free printable template for personal home use only.  Please link to this post and give credit if you share it online.

Be careful to leave spaces where there are spaces so the entire head or bow tie don't fall out.

I used craft paint to paint the bow tie red on the pumpkin.  You can order a striped hat like the one below or use one you already have or make a construction paper one.

As an Amazon affiliate I make a small percentage of sales if purchased through this link. Thanks!
 

There are so many fun ideas to create a Dr. Seuss inspired pumpkin.
Dr Seuss inspired pumpkins obSEUSSed
Grinch & yellow Sneetch Pumpkin from Tropical Texana
Cat with the Hat, right here on obSEUSSed
Lorax Pumpkin by Miss Nelson's got the camera
Full Glowing Cat in the Hat by Xtreme Carvers

See more Dr. Seuss inspired pumpkins on my Pinterest board.  I love the Lorax ones with fuzzy mustaches and eyebrows.


Follow all my boards to see all the Dr. Seuss ideas.
obSEUSSedPinterestBoard
If you make a Dr. Seuss inspired pumpkin you can share it in the comments below or email me a photo and I’ll add it to this post.  I’d love to see other’s creations.

Book Inspired Halloween Pumpkins: Cat in the Hat

Thursday, October 27, 2011

If you love children’s books characters, why not turn your pumpkin into one?
I’ve heard of classes doing this at school but you can try this at home too. Ask your child who their favorite character is and find a way to decorate a pumpkin that way. You can carve, paint, add accessories and more.
Of course, being obSEUSSed, I had to make a Cat in the Hat pumpkin.Cat in the Hat Black Pumpkin
First I free hand drew this with a pen, after looking at the Dr. Seuss book. Then I traced it with black marker once I knew which areas were okay to cut and which ones I should leave so it wouldn’t fall apart.    I created a template you can print and create your own.  Click here for the Dr. Seuss jack-o-lantern template. I used a small pumpkin carving knife, then lit it up with fake tea candles.
  Cat in the Hat pumpkin lit up
We grew nine pumpkins in our garden this year. I helped my daughter carve this Minnie Mouse pumpkin using the Disney carving template found here.  My husband turned the half green pumpkin into a dinosaur. My son turned his into a Frankenstein, skeleton eating pumpkin. I also turned another pumpkin into a haunted house where you paint the house on with acrylic craft paint then cut out the windows to show candle light through. I found this and many other great Halloween ideas on Pinterest. Originally found on Parents.com.
Pumpkin CollageI found more book character pumpkins and pinned them to my Book Character board on Pinterest. If you aren’t on Pinterest, you can do a Google search for “Book Character Pumpkins” to find more great ideas.  I love the David Shannon “Stripes” and “No David" pumpkins below. As well as the Arthur and Junie B. Jones pumpkins.
Pinterest Book Character Pumpkins
To follow my Pinterest Boards, click here.
We turned the Nightmare Before Christmas character, Jack Skellington, into a life size figure. Click here to see more.
Jack Porch 
If you’ve made a book character pumpkin I’d love to see it. You can leave a link to your blog in the comments below or upload your picture to the ObSEUSSed Facebook page to share with others.
Thanks,
Victoria Signature 11


I linked this project to:
The Play Academy at the Nurture Store - visit for more great ideas
Tatertots & Jello Weekend Wrap Up Craft Party

Glowing Halloween Crafts – What Was I Scared Of?

Thursday, October 13, 2011

Our favorite book by Dr. Seuss this month is  “What Was I Scared Of? ” A perfect spooky story for Halloween. Originally published as a short story in “The Sneetches” book back in 1961, this year we got to try out 2 new versions of the book.

I picked up a copy of the Glow-in-the Dark Encounter version at Sam’s Club for $7. My kids loved it! They sat by their reading lamp in their bed and would read a page then turn off their light to see the pants glow on every page. They’ve requested it several nights in a row now. I love the moral to the story: the pants are just as afraid of him, but he doesn’t know this until he confronts the pants. This is a great book to have a discussion about fear.
OCT 11 Blog6
 whatwasiscaredofappbuttonWhat Was I Scared Of? App Review:
We tried the Dr. Seuss app by Oceanhouse Media. What Was I Scared Of? is only 99 cents right now. I love how the kids can touch the pictures and the app tells you the words. I also love the inflection the narrator uses to keep the kids’ attention. It was a little fast paced for my 5-year-old to keep up with watching the highlighted words as it read to you but you can use the ‘Read it Yourself’ mode to go at your own pace and work on the words with your child.
whatwasiscaredofappcover
Glowing Halloween Crafts:
Make your own glow-in-the-dark pants to go with this story.
101_9733_1OCT 11 Blog3
I found a small scarecrow for $1.00 at Wal-mart. It is hooked to a stick but the body is about 7 inches tall.  I grabbed a round box of 15 glow bracelets for $1.00 at Target. I used 2 glow sticks for this project.
OCT 11 Blog4
ADULTS ONLY: Do this in the bathroom. I double checked to make sure the glow fluid inside was not toxic, but I also tried not to touch it at all.
I had Clorox wipes handy and cracked the bracelets. Then I cut off the end of one and dripped the fluid onto the scarecrow pants.
I needed more so I cut the other end, then I got some splatter on my counter. I wiped it up quickly with the wipes. It came off easily. I ended up using 2 sticks. The glow lasted several hours so we could enjoy it with our book experience.
OCT 11 Blog-1
If you are using Pinterest, here are a few other fun glowing crafts to try:
Try making Glow-in-the-dark play-dough. Or put glow sticks in balloons or in the bathtub or make an outdoor sign with them.
Pinterest Glow Board
Disclosure: I received a free version of the OMbook “What Was I Scared Of?” from Oceanhouse Media for review. We love all their apps we’ve tried so far. I have several others I’ve purchased. I purchased the glow-in-the-dark encounter book version at Sam’s Club. Check this book out at your library then decide if you’d like a version to keep.
Hope you have a spooky, GLOWing Halloween!
Victoria Signature 11


Linking this project at:

Make a No-Sew Poodle Skirt

Monday, May 16, 2011

How to make a No-Sew Poodle Skirt 

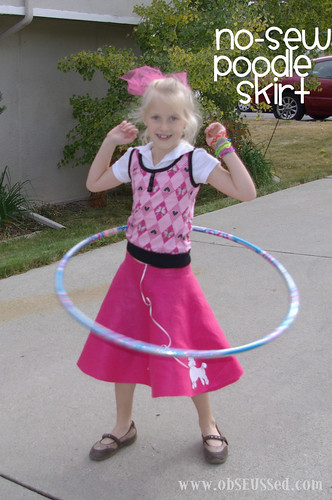
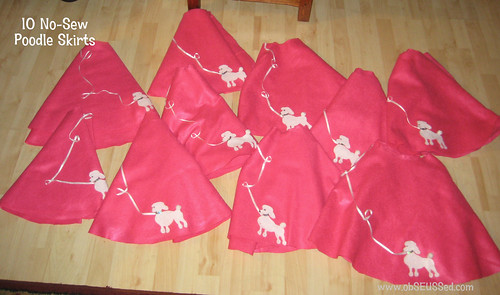
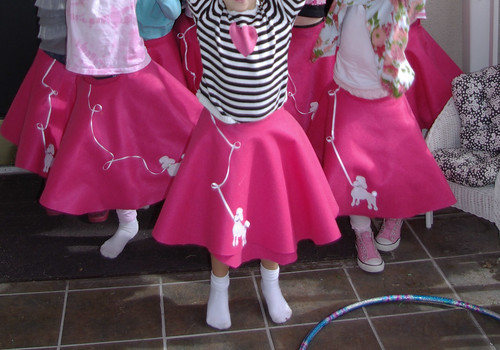
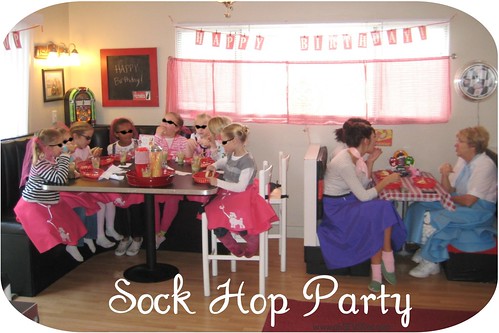
For our 50's Sock Hop birthday party I made 10 poodle skirts as dress-up favors for the girls to wear during the party, then take home.  I wanted to keep them simple and low-cost.  I made them for about $6 per skirt. Once I made the first one, the rest were much quicker to make so I thought I'd share how I did them to save you some time.  I'll admit I don't like making things that require sewing patterns or pinning fabric. I always end up using my seam ripper. So I came up with this NO-SEW pattern to make a poodle skirt. I also needed them to be adjustable because we had very different waist sizes coming to this party that I couldn't measure in advance.  These are perfect for a Halloween costume, playing dress-up or for a dance recital.

Materials Needed
For Skirt:
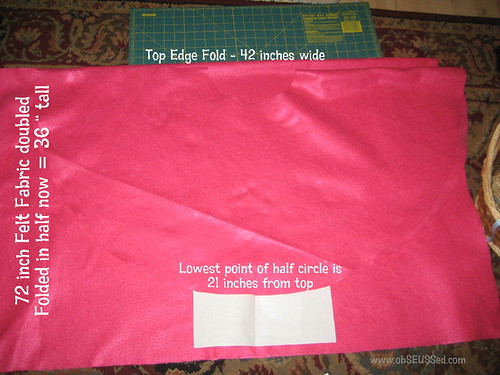
  • Measure waist to knees of the girl. However long you want it to go, double that number Then add 8. That is how big you'll want your square of fabric.  I wanted 17 inches long(doubled is 34 inches) plus  8 (for the waist cut) to make the square 42 x 42 inches to start. (Waist to knee length + 8 = length of 1 side of fabric square.)
  • 42 inch x 42 inch square piece of colored felt. (Popular 50's colors, pink, baby blue, purple, red or black) Buy 1 and 1/2 yards of 72 inch wide felt. (I used a 40% off coupon at Joann Fabrics for 1 huge cut to make 10 skirts)
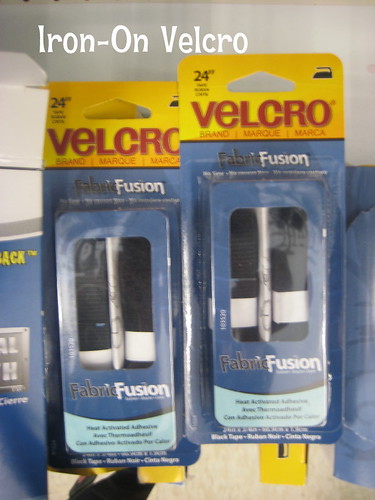
  • 1 package Iron-On Velcro (Amazon has it for $3 affiliate)
  • Measure tape
  • Fabric scissors and cutting mat
For Poodle:
  • Hot glue gun
  • 7 inch x 7 inch square of white felt (could use black) If you're just making one skirt you could easily buy the 8.5 x 11 sheet of felt from your craft store. If you need to make more, I recommend buying the 72 inch felt off the bolt.
  • small pom pom for tail (matching color)
  • Sharpie marker (black to draw eyes and nose)
  • Collar - 3 inches of sequin ribbon
  • Leash- 20 inches of 1/4 inch wide ribbon (often a spools run 3 for $1 at JoAnn's) 

  1. Lay out the felt folded to measure and make sure you have enough fabric. (This picture shows me using my first skirt as a template to copy and trace onto the fabric for my 2nd skirt).
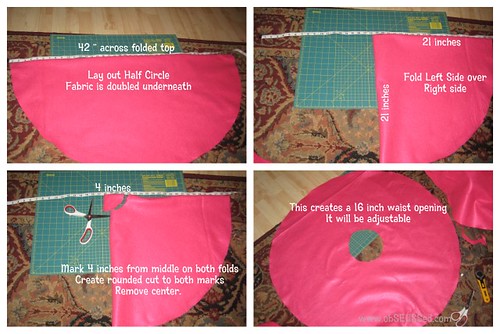
  2. Unfold and measure the square 42x42 and cut to make the square.
  3. Now, fold the 42x42 square into an 21x21 square.
  4. Cut a curved line from opposite corners to cut off the open edge. This curve becomes the bottom edge of your skirt. (See picture, this was my doll version size but you get the idea.)

5. While folded, mark 4 inches from the folded corner on both folded sides. Cut a curved line from each mark.  This creates a 16 inch waist opening. It will be adjustable.
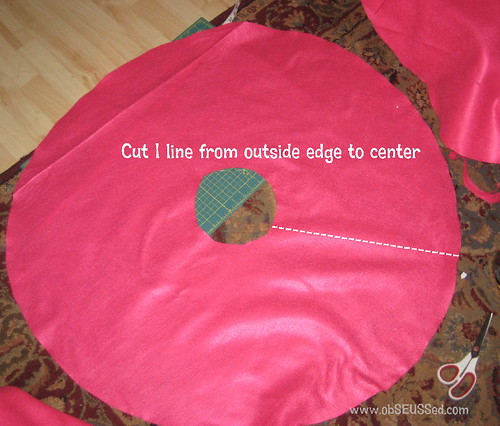
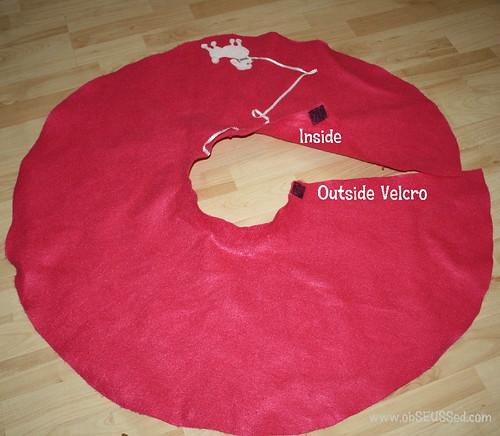
6. Pick any area and cut a line from the outer edge all the way to the center circle.
Pin It


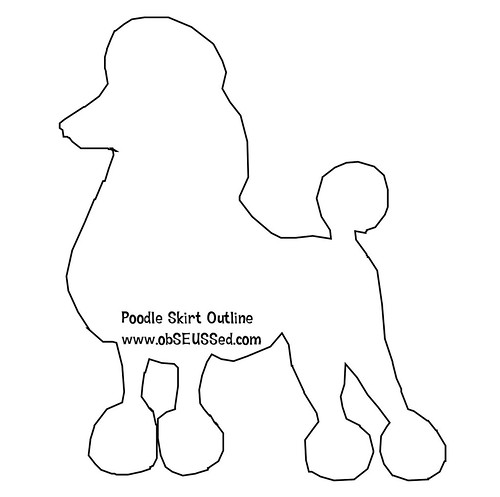
FREE PRINTABLE: I created this outline.
7. Copy and paste this image into 'Microsoft Word' or another program. You can adjust the size. You'll want it about 6 inches tall.


8. Print the template and cut out the poodle on your paper.
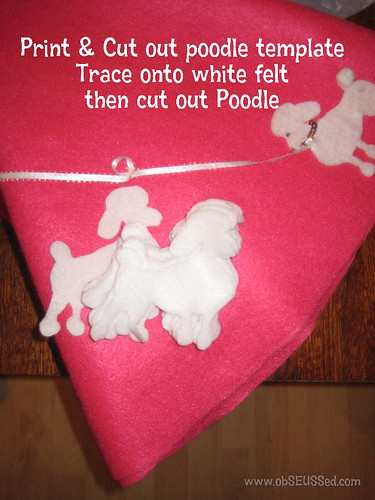
9. Place on white felt, trace around the edge.
10. Now cut out the felt poodle.


11. Hot glue the sequin ribbon behind the neck to hold in place on both sides. Hot glue one end of the leash ribbon behind the neck too. 

TIPS
Poodle Position: Wrap the skirt around your daughter to see where you want to lay the poodle.

EXCESS WRAP: You can cut the length of the circle shorter if you don't want as much excess wrap. If so, cut it first then add the velcro on the ends as directed below.

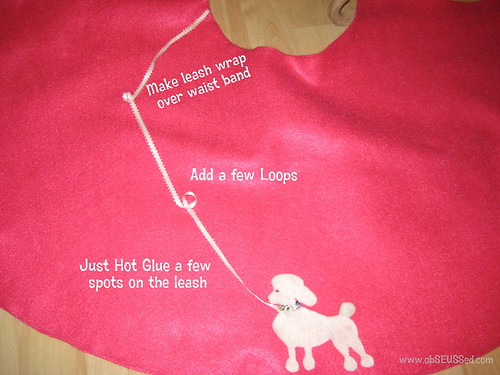
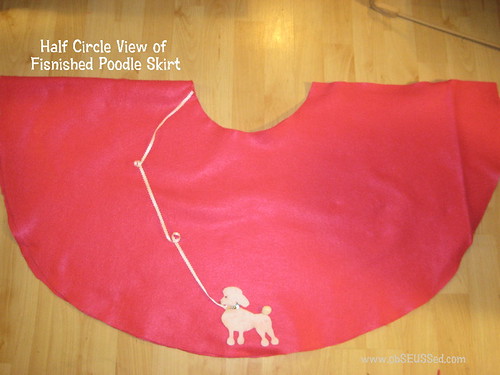
12. Now, hot glue the poodle onto skirt.
13. Then glue the pom pom on the tail.


14. Just hot glue a few spots on the leash to hold it in place.  Add a few loops for decoration.
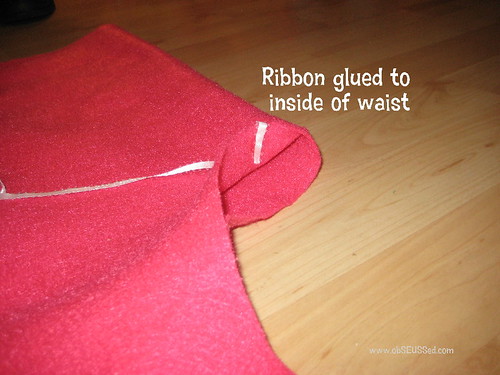
 15. Glue the ribbon up to the waist of the skirt and tuck onto back side of skirt.
16. Open velcro, cut 2 pieces of the loop/pokey style (not the soft matching velcro), 2 inches long.

17. Next, layout your velcro, one on outside top corner edge of skirt, one on inside top corner edge. You want the pokey part of the velcro so it will stick to the skirt once you wrap it.  Now iron both pieces on as directed by the velcro package.

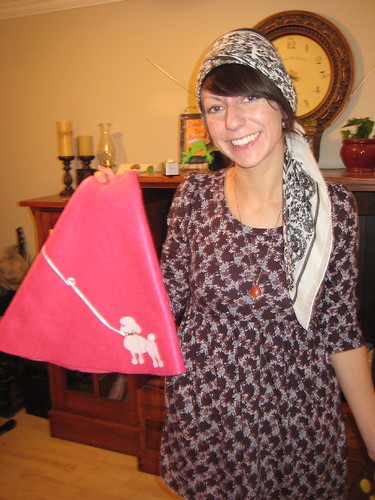
18. Try it on. Wrap it around your daughter and the velcro will stick to the skirt where needed. Works for larger and smaller waists.

My sweet sister helped me make 10 of these skirts for my daughter's birthday party.


Pin It

If you'd prefer to sew a skirt for everyday wear, check out the circle skirt tutorial on MADE. She has tips that would help you with this skirt as well.
When you need to make a quick skirt or a lot for a group, this pattern is perfect, but if you aren't the crafty type or would rather save time you can always just purchase a skirt on Amazon. The $14 price is great. (Disclosure: As an Amazon Affiliate, I do receive a small percentage of sales made using the link below. Thanks!)
   

  Children's Books: 
At obSEUSSed, we feature children's books and activities. We want families connecting their activities and reading experiences.  If you make this skirt, check out a poodle related book at your local library or try one of these books from Amazon.

I also found some fabulous paper dolls with 50's fashion and poodle skirts from Paper Studio Press.


See how to make a matching poodle skirt for an 18 inch doll.
I really wanted the Maryellen American Girl doll (for myself ;) but we made the skirt for my daughter's doll and she was happy to have the matching skirts.

See more 50's ideas at our Sock Hop Party.

If you try making a skirt I'd love to see pictures. If you post it online, leave a link in the comments below or send me an email (obSEUSSed (at) live.com)
Let me know if you have any questions about making your own poodle skirt.

UPDATE: November 2016. I love seeing all the comments of those who have used this tutorial to help them make skirts.  I'd love to see your pictures. Email me a photo of how yours turned out and I'll add it to this post for others to see. Email obSEUSSed (at) live.com (or click the email button in the top right column). Thanks so much! It makes my day to see others successfully making these cute skirts.

YOU DID IT! Comments and photos from readers who made the skirts. They turned out Swell!!


Rebecca in Texas said: "Just wanted to say thanks for posting your tutorial. I discovered it through a Google search when I found out my daughters' school would have 50's Day. I'm not crafty at all and was pretty intimidated to take on such a project, but your easy instructions made it a breeze. My girls love their skirts and I had enough scraps to make one for their baby sister as well!" 
Thanks again and please keep blogging! Rebecca"


Mike in Georgia made these for his twin daughters:
"I had no experience and bought a yard and half of each felt, more than I needed since each girl was 14+8 and 16+8 for size.
I ended up cutting the wrong color first so both became 14+8. All good as they look good on the girls. They received lots of comments and even with buying extra materials and forgetting to give Joann my 40% coupon it was still less than $27 for two skirts. Two hours later (9pm to 11pm the night before the dance…) they were completed.
By the way – These are twin 8 year olds, 1 minute apart… Thank you for sharing a quick and easy plan to follow. Mike"

10/23/13 Mirna M. said "Thanks so much for the easy steps. I'm horrible crafty but this turned out pretty good. Here is my skirt."


July 2014, Kathy (@mabelgabel on Instagram) shared this photo.  She used this pattern to help her group of girls at church to make their own skirts for a daddy-daughter 50's party.


Linking to more great ideas at Tip Junkie.
(Disclosure: As a Google & Amazon Affiliate, I do receive a small percentage of sales made using the links below. These would be great to complete the costume or prepare for a 50's Party. Thanks!)

Quick Pumpkin Activities

Tuesday, October 19, 2010

If you don't have time to carve a pumpkin this Halloween (or if you want to avoid the mess) try some of these quick pumpkin activities.

FIVE LITTLE PUMPKINS:
Start with a book at bed time. This one is great for toddlers too.
It has been a traditional rhyme since my mom was a little girl. She taught it to me and I'm sure most people have heard it.  The poem, "5 Little Pumpkins," can be found in this cute book by Dan Yaccarino or below. Remember to clap your hands (or really turn out the light) at the part where you say "Out went the light"

Five Little Pumpkins

Five little pumpkins sitting on a gate.
The first one said, "Oh, my it's getting late!"
The second one said, "There are witches in the air."
The third one said, "But we don't care."
The fourth one said, "Let's run, let's run!"
The fifth one said, "Isn't Halloween fun?"
Then woooooo went the wind
And OUT went the lights.
And those five little pumpkins rolled right out of sight.

Another Quick Idea
REAL ORANGE PUMPKINS:

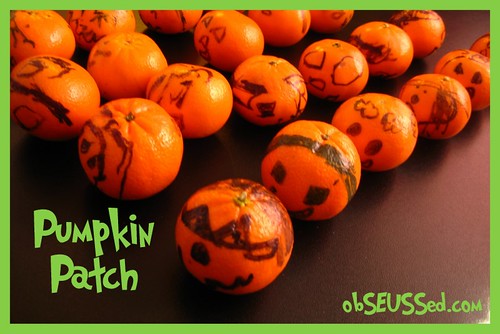
Get some cute Clementine oranges and give your kids some permanent markers to decorate faces on them.
Under adult supervision my 4 & 6 year old loved this. Then they gave a bag to our neighbors.

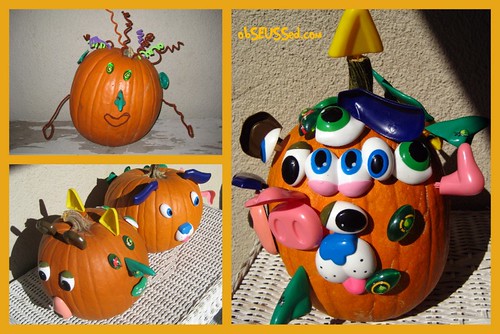
PIPE CLEANER PUMPKIN: Use pipe cleaners to decorate a pumpkin in under 5 minutes. Curl a few or leave them straight.  Use siscors to cut them (they are way too hard to pull apart by hand - trust me, I've tried. Remember there is a wire under that fuzz).
POTATO HEAD PUMPKIN: Use pieces from Mr. Potato Head toy or buy pieces at the store that have a little bit longer and pointy tip. You can find them all over. I've seen them at Target and WalMart.  Our kids like to change the look every day for a fresh spooky surprise.  Or try 4 faces at once (on each side) so you can rotate it to your favorite each day.


PUMPKIN PRETZEL KISSES: These are a favorite new treat.  The kids did all the work for these. I preheated the oven to 350 degrees. My 6 year old lined up pretzels on a cookie tray, my 4 year old unwrapped all the kisses (Pumpkin Spice, Candy Corn and Carmel Apple flavors) then set one one each pretzel.  Then I popped them in the oven for 5 minutes to melt, took them out and pushed them down a little with the bottom of a spoon.  The carmel ones got messy and stuck to the tray but the others turned out great.


Here is one of my little helpers and my cute little 3-month-old pumpkin.

Linking up to Today's Creative, Get Your Craft On
Skip To My Lou, Made By You Monday
Ain't She Crazy Theme Party Thursday 
Tatertots and Jello Weekend Wrapup Party
Join  us Saturdays at tatertotsandjello.com for the weekend wrap    up           party!

LinkWithin

Related Posts with Thumbnails