Showing posts with label sew. Show all posts

12 Days of Christmas Books Advent Using Fabric Gift Bags

Tuesday, December 1, 2015

 I tried wrapping Christmas books for each day in December leading up to Christmas as a book advent.  Sure, kids love to pull off the paper, but I didn't like wasting all that paper and how much time it took to wrap the books.  I decided to create my own fabric gift bags to re-use each year. These are 'Sew' simple! I have very basic sewing skills. I'll try it if it has straight lines, no patterns and no pinning. These bags are pretty much like a little pillow case with a ribbon sewn onto the outside for tying.
The thing I love best about these books is that you can put 1 or more books inside for a surprise each day. Leave them under the tree for your children to open counting down the 12 days before Christmas (you could make 24 if you are really ambitious).


To see my instructions for the The 12 Days of Christmas Fabric Gift Bags, I shared them here:  Skip to My Lou. (originally posted Dec. 2014).

The bags can be used for a book advent (from books you already own or borrowed from the library or new gifts) or any other special gifts to count down to Christmas. Perfect for holiday gift giving to your children, family, friends or teachers.


DIY GIFT IDEA:

This Truffula Tree elastic bookmark would be an excellent gift. It was quick and simple enough for kids to make too.  They could make one as a gift for a teacher, librarian or a grandparent.


See how to make the bookmark here.


Don't forget to visit my 12 Days of Christmas gift bags over at Skip to My Lou.


Thanks for stopping by.  Take a look around obSEUSSed for more kid and DIY crafts.

How to Make a Toy Bean Bag for Stuffed Animals

Thursday, September 1, 2011

Our stuffed animals were taking over our house. How do you store your stuffed toys?

AUG 11 BLOG9-1
I made huge toy bean bags to hold all our stuffed animals. I started writing about making the girl and boy bags below (that I made at Christmas time) then realized I had Dr. Seuss fabric laying around and a bunch of Dr. Seuss stuffed animals so I decided to make a bag today. Without windows it took me 20 minutes.
AUG 11 BLOG9

See the stuffed animals peeking out of the mesh windows?

110_1398_1

HOW TO MAKE A TOY BEAN BAG:
This toy bag has a mesh window and a drawstring opening so kids can take their animals in and out. Filling it with stuffed animals makes them soft to sit on so it becomes a functional chair in their room.
 110_1421_1
Items needed:
1 – 1.5 yard of fleece fabric (1.5 is what I used, they are a little big, they fit so many animals they get too heavy to move so I would stick to just 1 yard (of 72” fleece) you’ll need 1 yard for each side of the bag
1/2 yard of mesh fabric – there are a variety in the sports or outdoor section at the fabric store.
1.5 yard cord or rope (often found in the ribbon area)
White thread for the sewing machine, scissors, cutting mat, cereal box, pins
Directions:
Look at pictures to see how I made the toy bags. If you’d like more directions please email me with questions.
Disclosure: I’m not a great seamstress. I’ll try things that don’t require a pattern, I dislike using pins, I’ll attempt it if it has straight lines and I often have to use my seam ripper.
Toy Bags
I folded the fabric over to look like a rectangle. I placed a cereal box on top as my guide for the window, then cut around it.
Then I placed the mesh over each window and pinned it (it helps it stay in place as you sew). Then I cut off the selvage of the fleece (that is the bottom edge of the fabric – mine had text printed on it, you could just use some scrap fleece.  Place the 1 inch selvage or scrap strips along the edge of the mesh. Sew the selvage to the mesh and the bag fabric about .5 inch away from the window opening.
Toy Bags1
Then turn the bag to the other side so you can sew the outside of the window. I used a zig-zag stitch right around the edge of the window to seal the mesh and window.
See pictures of a bigger mesh I used on this blue bag. See the scrap fabric strips I used for the inside of the window? This gives it so much more support and helps so you don’t have to sew right on mesh.
Toy Bags2
After sewing both windows, sew the open edges of the bag together, leave the top open.
110_1154_1
Now for the draw string top.  I folded the top edge over twice (about 1.5 inch thick) to give it a nice finish. Then I sewed the bottom of the folded edge to the bag while it was inside out. 
Toy Bags5
After I finished, I turned the bag right-side out and found the side seam near the top. I cut a small slit on each side of the seams to run my rope through. I used a large saftey pin on the end of the rope to insert into the hole and feed it through the top rim of the bag. once the other side was out I knotted each end of the bag then you can tie them in a bow.
110_1397_1 Click here to see more activities to do with stuffed animals.
baby_laugh_seuss_stuffed_animals_obSEUSSed_1
Victoria Signature 11


More fun ideas here:
Thirty Hand Made Days

Poodle Skirt Tutorial for 18 inch doll

Saturday, May 14, 2011

How to make a no-sew poodle skirt for your 18 inch doll.


I made dress-up poodle skirts for my daughter's 7th birthday party. I had to make a matching one for her American Girl doll. These are so simple, your daughter can help you make one.

Materials Needed:
For Skirt:
16 inch x 16 inch square piece of colored felt. (Popular 50's colors, pink, baby blue, purple, red or black)
1 package Iron-On Velcro
Measure tape
Fabric scissors and cutting mat

For Poodle:
Hot glue gun
6 inch x 6 inch square of white felt (could use black)
small pom pom for tail (matching color)
Sharpie marker (black to draw eyes and nose)
7 inches of sequin ribbon for leash and collar 
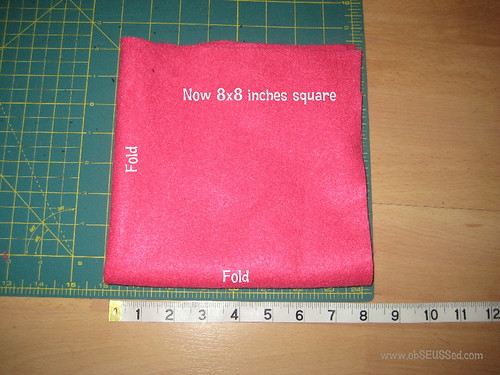
Start by folding the 16x16 square into an 8x8 square.

From open corner to open corner, cut a curved diagonal line across the middle of the fabric.

The curved edge becomes the bottom edge of the skirt.

Now mark 3 inches from the folded corner on both folded sides. Cut a curved diagonal line from each mark.

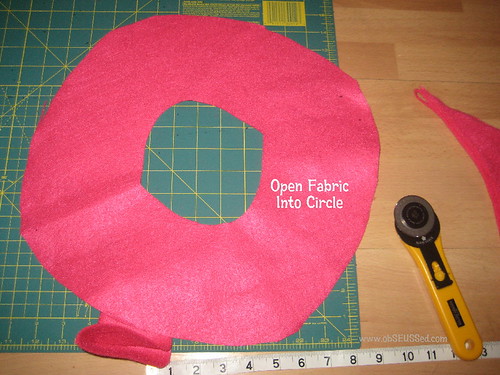
Now you should have a circle with a hole in the center for the waist.

Pick any area and cut a line from the outer edge all the way to the center circle.

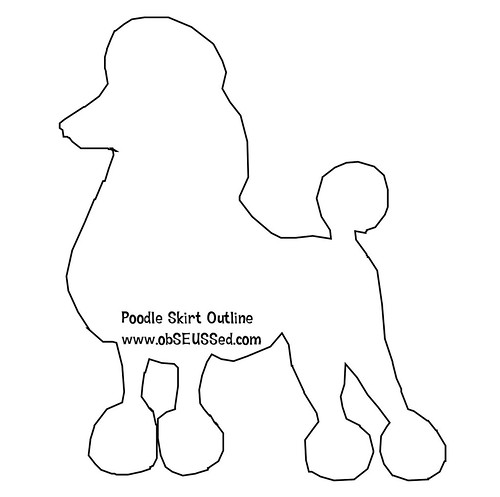
FREE PRINTABLE: Poodle Outline
Copy and paste this image into 'Microsoft Word' or another program. You can adjust the size. You'll want it about 3 inches tall.
Print the template and cut out the poodle on your paper.
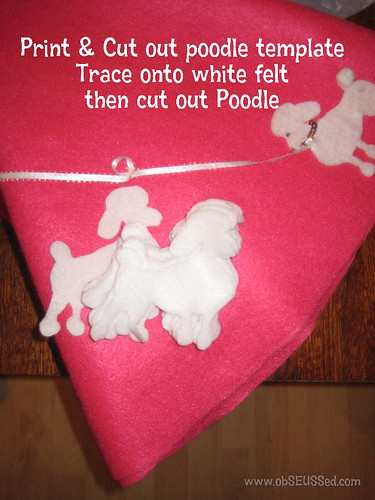
Place on white felt, trace around the edge.
Now cut out the felt poodle.

Hot glue the sequin ribbon behind the neck to hold it in place.
Hot glue the poodle onto the skirt (lay it out first and wrap around the doll to see where you want it to lay).
Then glue the pom pom on the tail. 
Next, glue the ribbon across the poodle's neck then glue it up to the waist of the skirt and tuck onto back side of skirt.

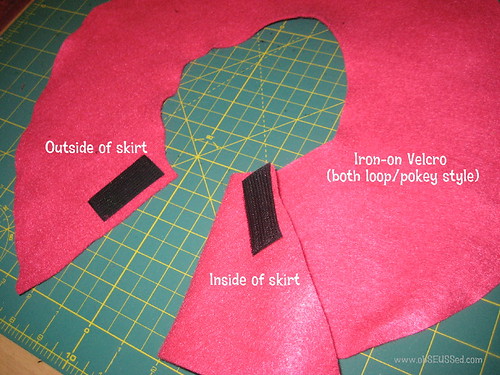
Open velcro, cut 2 pieces of the loop/pokey style (not the soft matching velcro), 2 inches long.

Next, layout your velcro, one on outside top corner edge of skirt, one on inside top corner edge. You want the pokey part of the velcro so it will stick to the skirt once you wrap it.  Now iron both pieces on as directed by the velcro package.


Wrap it around your doll and the velcro will stick to the skirt as needed.
You can cut the length of the circle shorter if you don't want as much excess wrap. If so, cut it first then add the velcro on the ends.

Make sure leash is tucked into waist.  Now find a cute shirt to match and tie some pink tool in her hair for a bow and your set for the Sock Hop!

Make matching poodle skirts. See tutorial for girl size skirt here.

Linking to more great projects at Tip Junkie.

6th Day of Christmas Books: Nativity Activities

Saturday, December 18, 2010

Celebrating The Twelve Days of Christmas Books

On the 6th day of Christmas Books, obSEUSSed gave to me
6 Nativity Activities (say that quickly 6 times)

Our family enjoys books and activities about the Nativity during the Christmas Season. After all, it is the Reason for the Season. 
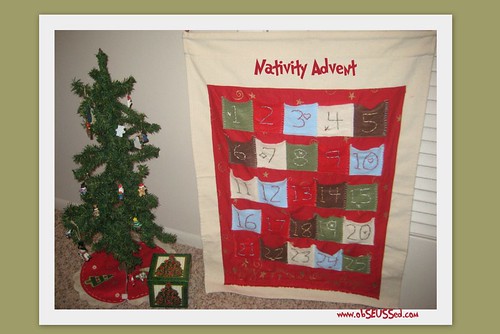
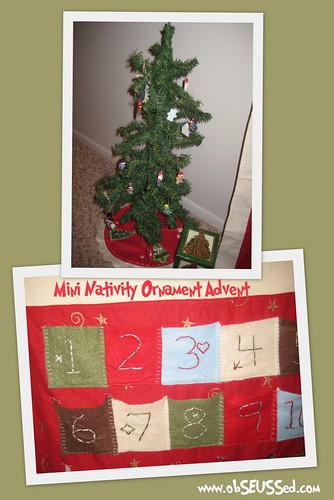
I created this wall hanging Advent Calendar with pockets that hold little 1 inch ornaments. The kids take turns adding an ornament to the tree each night before bed.
I found the ornaments, mini 2-foot tree and tree skirt at Big Lots. The first 12 ornaments are a festive set with Santa, snowflakes, snowmen and more. The ornaments I put in the last 12 pockets are from the Nativity so as we get closer to Christmas we discuss each figure and what they represent. The baby Jesus ornament is in the 25th day pocket so we can add it to the tree on His birthday and remember Him.

I hand stiched the numbers onto felt with embroidery thread, then I sewed the pockets on using an applique stitch. I keep the ornaments in the little box after Christmas.

FAMILY FUN ACTIVITY:

We try to act out the nativity on Christmas Eve as we read the story from the Bible. We use towels on our heads for a quick costume, although my mother-in-law just bought some simple animal costumes from Oriental Trading for us to use this year.

We also love the Little People Nativity set so the kids have a hands on activity to retell the story. (See below with books.)

BOOKS:
Here are some great Nativity books that we have in our collection.

LinkWithin

Related Posts with Thumbnails